Pom pom me up! This year I’ve got a bit pom pom obsessed and I have started making bits for the house. My latest pom pom creation is a festive wreath, take a look at this guide at how to make one yourself. It’s very easy, just a bit time consuming!
Since we bought our first home I’ve been determined to make things for it instead of buying everything. It’s not only down to being on a budget but, sometimes I’m convinced I could create something just as good as those things in the shops.
Oh dear, how big headed does that sound! 😂😂😂 But, hey, that’s what goes through my head, I look at in the shop and then I convince myself it’s easy to replicate. Sometimes my thoughts are justified, other times (usually on cooking projects!) I’ve bitten off more than I can chew! It’s lucky I like a challenge!
I’ve coveted pom pom wreaths for a few years now and I knew it was time to have a go myself. Here’s what I bought and how I put it together.
What you need…
Shopping/project list
- 1 wire ring (usually found in garden centres, florists or Hobby Craft)
- 1 polystyrene ring (also usually found in garden centres, florists or Hobby Craft). This ring should sit inside the wire ring but with enough overlap so they can be fastened securely.
- I bought nine 200g balls of each colour wool in various colours (For this project: 9 balls – 3 white, 3 red, 3 green) but the colours are really up to you. I had two balls left over which I’ve used for other projects. The quality of wool isn’t important as you aren’t wearing it and it’s not going in the wash. You can get wool from anywhere, I got these particular colours from The Range, and I think at the time each 200g ball was £1.30.
- TOP TIPS: Buy the wool out of season. I bought these in the summer when the colours were less in demand and a little cheaper. My top tip is to buy all the wool for your project in one go so the colours match. Otherwise, much like in knitting, you get different tones of the colours from different dye batches.
- Sharp scissors
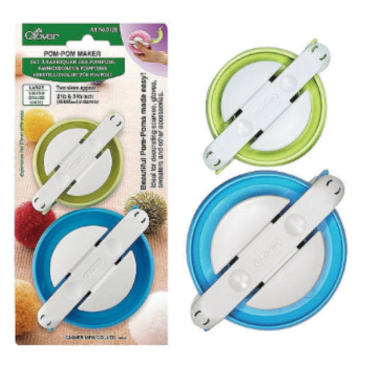
- Pom pom makers in various sizes – seriously buy some. John Lewis usually has them in stock in various sizes. Gone are the days of cardboard rings made out of a Kellogs cereal packet. These weird plastic contraptions speed up the process and make it easier to cut through the layers. It still takes a long time but far less than it would with the cardboard method.


How to make the wreath…
- Tie the polystyrene wreath to the wire wreath with some wool.
- Have the wire ring as the front and the polystyrene at the back, this will make your wreath stand out from your door frame without having to pad your wreath with other materials or pom poms that won’t be seen! It also helps the structure of your wreath and gives you something to tie the pom poms on to.
- Open the pom pom makers -it’s time!
- Make a pom pom of each size and roughly work out how many you’ll need, I adapted this as I went along as I knew wanted a pattern. If you don’t want a pattern or are using lots of colours I’d recommend making some bigger ones, attaching them and working from there. When you make each pom pom make sure the length of wool that you use to to tie around the middle is long enough to be able to wrap around the wreath template and secure with a knot at the back. Resist the temptation to use a glue gun, it’s messy, the pom poms can’t be adjusted and it is a bit more of an environmentally friendly way to construct it.
- Attach the pom poms until the wreath is full.
- Add pom poms to build structure until you are happy with the size and look.
- Hang that band boy up and feel proud! Don’t forget to trim each pom pom so they are tidy, I also did some shaping and trimming with the scissors once the pom poms were attached.


It’s really easy and I’d recommend making the pom poms while in front of the tv as you don’t really have to think about them.
I’m really pleased with the final result and it’s brightened up the front door. The shape and colours really make an impact and I’m thinking of doing a red, grey and white one and a multicoloured one next.
It’s definitely something I’ll bring out year after year and once I bought the pom pom makers it really sped up the whole process. It’s not one you’ll complete in an evening though so get making now if you want it up this year.
If you want any other tips or aren’t sure about any of the steps pop me a comment! Have a great time making this simple but effective Christmas wreath, I’d love to see your results if you’ve give it a go.


2 thoughts on “How to make a pom pom Christmas wreath”